The excessive rainfall in Western Washington’s climate may cause drainage issues in your lawn – everything from soggy turf to water damage in your basement and around your home’s foundation. You can address these problems by installing a French drain to help divert standing water from your home, hardscape patios, and driveway.
What is a French Drain and How Does it Work?
A French drain – also called a perimeter drain, agricultural drain, or a curtain drain – involves a trench and an underground pipe that work together to prevent water buildup and redirect standing water away from a specific trouble spot. Water seeks the lowest point along the easiest path, so a French drain pipe is sloped, letting gravity carry the water to a designated drainage point or outlet.
Project Preparation
Determine where the water collects in your yard and where you want to divert it. Choose a direction lower than your starting point that drains away from your home (and your neighbor’s property!). If you can, guide the water to an existing drainage system, like a storm sewer, build a dry well, or direct it toward a curb or road.
As you plan your project, research your area’s zoning restrictions and obtain any necessary permits. A few days before you begin, call 811, and have your local utility company mark underground electric, gas, water, and cable lines in your yard so you steer clear of them during your project.
Materials Needed
- Spray paint
- Shovel (or trench digger for larger yards)
- Drainage pipe
- Connectors
- Water-permeable landscape fabric
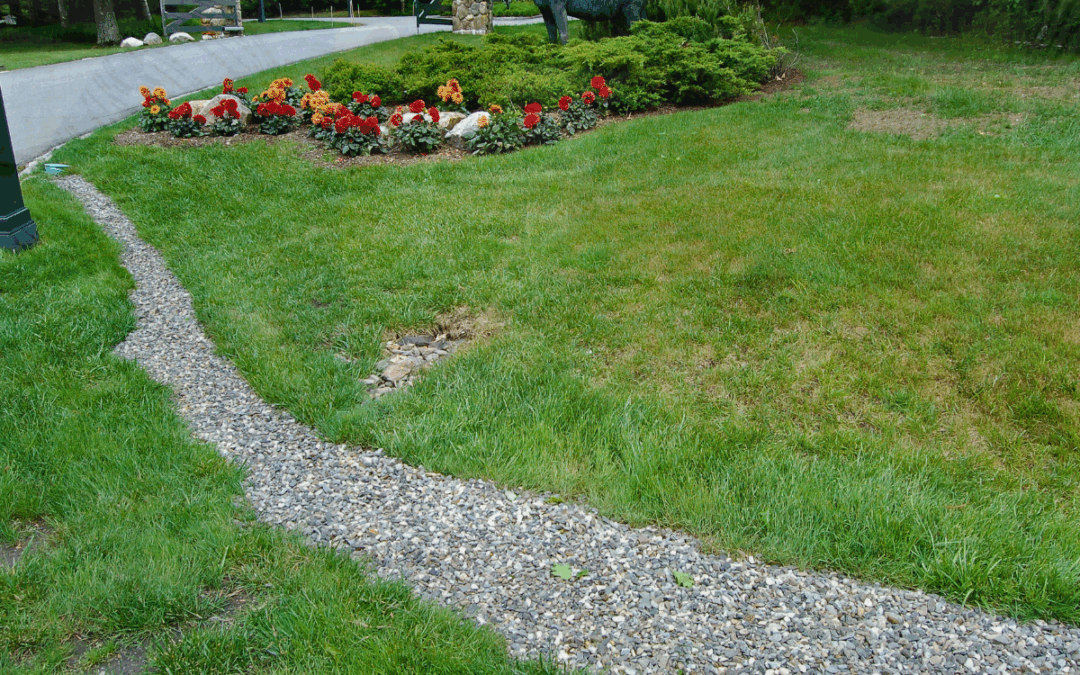
- Drain rock*
- Drainage inlet
- Catch basin
*For French drains, experts recommend ⅞” or larger crushed granite, gravel chips, or washed river rock without minus or “fines”—the fine particles that are a byproduct of crushing that can clog drains and hamper water flow. Instead, opt for rock that has been run through a sieve, which removes the fines. Lenz offers a large collection of affordable, bulk gravel options that are available for pickup or delivery.
Step-by-Step Guide to Installing a French Drain
1. Dig.
- Use spray paint to mark the drain’s path and dig a trench along it. You may want to rent a trench digger depending on the size of your property.
- Property size determines trench size, but plan on making the depth between 10-18” deep and 9-12” wide.
For best results, French drains should slope a minimum of one percent. This means that your drain should slope down at least 1” every 10’.
2. Install the inlet and catch basin.
- Connect a drainage inlet grate to the catch basin. At the beginning of your trench, where the water pools most, dig a hole and add 6” of gravel. Position the catch basin on top of the gravel, ensuring it is slightly below ground level.
3. Pour the gravel.
● Pour roughly 3” of gravel along the bottom of the trench.
4. Line the trench.
- Place water-permeable filter fabric over the gravel bedding. This fabric will help keep the French drain free of dirt, silt, and tree roots.
- Allow for at least 10” of excess fabric on either side of the trench.
5. Connect the pipes.
● Connect one end of the pipe to the catch basin.
● Use connectors, or fittings, to extend the pipe from the catch basin to the end of the trough. While these are tight fitting and unlikely to come apart, wrap the connectors with waterproof tape or duct tape to ensure they stay tightly connected during installation.
● Flexible drainage hoses are inexpensive and are an especially good choice for curved drains. PVC pipe is a durable option for straight drains. If your hoses are not already perforated, drill ½” holes about 6” apart along the length of the pipe for water drainage.
6. Lay the pipe.
- Lay the connected pipe on top of the gravel with the drainage holes pointed downward.
- Pour water into the inlet grate to test the flow of the drain.
7. Cover and fill.
- Wrap the excess filter fabric over the pipe and add 3” of gravel. The rock should stop below ground level for proper drainage.
- Fill the trench with topsoil, compacting it to fully cover the French drain. Reseed the surface if necessary. Lenz offers a variety of topsoil options.
Maintaining Your French Drain
- Inspect and clean the inlet grate and outlet point every three months.
- Flush the system annually to clear debris and keep the water flowing freely.
French Drain: An Effective Solution for Water Diversion
French drains are a simple and effective way to divert standing water and reduce soil erosion. By following the steps above, you can install a drainage system that protects your home and outbuildings from flood damage.
Thanks for reading.
If you found this article helpful, get to know us by following Lenz Enterprises on Facebook and Instagram. We regularly provide education about soil, compost, gardening advice, and plenty of humor too! If you’re located in western Washington and need gravel or other Earth materials, call us at 360-629-2933. We’re here to help.